Lesson 4: Dynamic Inputs
🏳️ Haven't completed the previous lesson?
No worries! You can pickup from here:
git checkout tags/lesson-4
In this lesson, we will implement the functionality to add new catches to our trip log. When the user fills out the "Add Catch" form and clicks the button, we need to save this data to the offline database (IndexedDB) using RADFish and then update the user interface to display the newly added catch in the "Recorded Catches" list.
Step 1: Setting Up the Catch Collection
Before we can save catch data, we need to extend our RADFish storage schema to include a new collection for individual catches.
1.1: Add the Catch Collection Schema
RADFish organizes different types of data into separate collections. While our "Form" collection stores trip-level information (trip date, start time, start weather), we need a separate "Catch" collection to store individual catch records.
Open src/index.jsx and locate the collections section within the trip store. You'll need to add the Catch collection schema after the Form collection as shown in the highlighted lines below:
  collections: {
    TripCollection: {
      schema: {
        fields: {
          id: {
            type: "string",
            primaryKey: true,
          },
          step: {
            type: "number",
            required: true,
            default: 1
          },
          status: {
            type: "string",
            required: true,
            default: "none",
          },
          tripDate: {
            type: "string",
            required: true,
          },
          startTime: {
            type: "string",
            required: true,
          },
          startWeather: {
            type: "string",
            required: true,
          },
        },
      },
    },
    CatchCollection: {
      schema: {
        fields: {
          id: {
            type: "string",
            primaryKey: true,
          },
          species: {
            type: "string",
            required: true,
          },
          weight: {
            type: "number",
            required: true,
          },
          length: {
            type: "number",
            required: true,
          },
          latitude: {
            type: "number",
          },
          longitude: {
            type: "number",
          },
          time: {
            type: "string",
            required: true,
          },
          tripId: {
            type: "string",
            required: true,
          }
        },
      },
    },
  },
Understanding the Catch Collection Schema:
species: String field for the type of fish caught (required)weightandlength: Number fields for physical measurements (required)latitudeandlongitude: Optional number fields for GPS coordinatestime: String field for when the catch was recorded (required)tripId: Links each catch to its parent trip (required for data relationships)
This schema ensures each catch record has consistent structure and validation rules. The tripId field creates a relationship between catches and their associated trip.
1.2: Understanding Data Relationships
RADFish uses a collection-based approach where related data is stored in separate collections but linked through foreign keys:
- Trip Collection: Stores trip-level data (one record per trip)
- Catch Collection: Stores individual catch data (multiple records per trip)
- Relationship: Each catch record contains a
tripIdfield that references the trip'sid
This approach provides several benefits:
- Flexibility: Add unlimited catches to any trip
- Performance: Query catches independently from trip data
- Data Integrity: Each collection has its own validation rules
Step 2: Component Setup with Custom Hooks
Now we'll set up the CatchLog component using the custom hooks. The necessary imports have already been provided for you in the CatchLog.jsx file.
2.1: Understanding the Provided Imports
Open src/pages/CatchLog.jsx and you'll see these imports are already included:
import React, { useState } from "react";
import { useApplication } from "@nmfs-radfish/react-radfish";
import {
  Button,
  ErrorMessage,
  Form,
  FormGroup,
  Icon,
  Label,
  Select,
  TextInput,
  TimePicker,
} from "@trussworks/react-uswds";
import {
  FIELD_NAMES,
  SPECIES_OPTIONS,
  TIME_PICKER_CONFIG,
  STORE_NAMES,
  COLLECTION_NAMES,
} from "../utils";
import { useTripNavigation, useTripData, useCatchData } from "../hooks";
import { Layout } from "../components/Layout";
Understanding the Provided Imports:
- Utility Constants: Predefined values for species options, time picker configuration, and store/collection names
- Custom Hooks:
useCatchDatamanages catch-specific operations, building on the patterns from lesson 3 - Layout Component: Provides the grid structure and step indicator (passed
currentStep={2}for the Catch Log page)
The complete UI structure is already provided in the file. You'll focus on implementing the core event handlers that make the form functional.
2.2: Understanding the Component Setup
The component setup with custom hooks is already provided. Let's understand how these hooks are initialized:
function CatchLog() {
  // --- RADFish Application Context ---
  const app = useApplication();

  // --- Custom Hooks ---
  // Navigation hook for trip-specific routing
  const { tripId, navigateHome, navigateWithTripId } = useTripNavigation();

  // Trip data hook - only used for verification and step updates
  const { updateTrip } = useTripData(
    tripId,
    (error) => {
      console.warn("Trip loading error:", error);
      navigateHome();
    },
    { loadOnMount: false } // Don't load trip data, just verify existence
  );

  // Use custom hook for catch data management
  const {
    catches,
    isLoading,
    addCatch,
    setCatches
  } = useCatchData(tripId, (error) => {
    console.warn("Catch data error:", error);
    if (error.message === "Trip not found" || error.message === "No trip ID provided") {
      navigateHome();
    }
  });
Understanding the Hook Setup:
useTripNavigation(): ProvidestripIdand navigation functions.useTripData(): Used here only for updating trip step, not loading data (loadOnMount: false)useCatchData(): Manages all catch-related operations:catches: Array of catch records for this tripisLoading: Loading state for async operationsaddCatch: Function to add new catchessetCatches: Direct state setter for optimistic updates
2.3: Component State Management
The local state for form management is also already set up in your file:
// --- State Management ---
// Form management state
const [catchTimeKey, setCatchTimeKey] = useState(0); // Forces TimePicker re-render on reset

// New catch form state
const [currentCatch, setCurrentCatch] = useState({
  species: "",
  weight: "",
  length: "",
  latitude: "",
  longitude: "",
  time: "",
});
const [errors, setErrors] = useState({}); // Validation errors for new catch form
Understanding State Management:
catchTimeKey: Used to force TimePicker component re-rendering when resetting the formcurrentCatch: Stores the form data for the new catch being enterederrors: Stores validation errors for the new catch form (infrastructure for lesson 5)
Notice how we separate concerns: the useCatchData hook manages the persistent catch data, while local state handles temporary UI concerns like form inputs and error display.
Step 3: Understanding the Custom Hooks
Before implementing the form handlers, let's understand what custom hooks are and how the navigation and data management hooks work.
3.1: What Are Custom Hooks?
Custom hooks are JavaScript functions that:
- Start with the word "use" (like
useState,useEffect,useCatchData) - Allow you to extract and reuse stateful logic between components
- Can call other hooks (both built-in and custom)
- Return values that components can use
Why Create Custom Hooks?
- Code Reuse: Share logic between multiple components without duplicating code
- Separation of Concerns: Keep components focused on UI while hooks handle business logic
- Cleaner Components: Move complex state management out of components
- Testability: Test business logic independently from UI components
3.2: The useTripNavigation Hook - Simplifying Navigation
Let's start with the simpler useTripNavigation hook. In lesson 3, you manually created navigation functions like this:
const navigateWithTripId = (path, tripId) => {
  navigate(path, { state: { tripId } });
};
The useTripNavigation hook extracts this pattern into a reusable hook:
const { tripId, navigateHome, navigateWithTripId } = useTripNavigation();
Inside the Hook:
export const useTripNavigation = () => {
  const navigate = useNavigate();
  const location = useLocation();

  // Extract tripId from location state if it exists
  const tripId = location.state?.tripId;

  // Navigate to a route with tripId in state
  const navigateWithTripId = (path, tripId, additionalState = {}) => {
    navigate(path, {
      state: {
        tripId,
        ...additionalState
      }
    });
  };

  // Navigate to home page
  const navigateHome = () => {
    navigate("/");
  };

  return {
    navigate,        // Raw navigate function if needed
    location,        // Current location object
    tripId,          // Extracted trip ID from state
    navigateWithTripId,  // Helper for trip-aware navigation
    navigateHome,    // Quick home navigation
    navigateBack     // Navigate back with tripId preserved
  };
};
Benefits of This Pattern:
- No Repeated Code: Every component gets the same navigation logic
- Automatic tripId Extraction: No need to manually check
location.state?.tripIdin each component - Consistent Navigation: All trip-related navigation follows the same pattern
- Type Safety: In TypeScript, you'd get proper typing for all navigation functions
This hook demonstrates how even simple repeated patterns benefit from extraction into custom hooks.
3.3: The useCatchData Hook - Managing Complex State
Let's examine what happens inside the useCatchData hook when you call it:
const { catches, isLoading, addCatch, setCatches } = useCatchData(tripId, onError);
Inside the Hook:
-
State Management
const [catches, setCatches] = useState([]);      // Array of catch records
const [isLoading, setIsLoading] = useState(true); // Loading indicator -
Data Loading Function - Using RADFish APIs
The
loadCatchesfunction demonstrates key RADFish features:// RADFish provides the app instance via useApplication hook
const app = useApplication();
// Access your configured store by name
const tripStore = app.stores[STORE_NAMES.TRIP_STORE];
// Get specific collections within the store
const tripCollection = tripStore.getCollection(COLLECTION_NAMES.TRIP_COLLECTION);
const catchCollection = tripStore.getCollection(COLLECTION_NAMES.CATCH_COLLECTION);
// Query data using collection methods
const existingTrips = await tripCollection.find({ id: tripId });
const existingCatchesData = await catchCollection.find({ tripId: tripId });What RADFish Provides:
- Stores: Named containers for your data (like databases)
- Collections: Tables within stores that hold specific types of records
- Query Methods:
find()to search records by criteria - Error Handling: Graceful handling when collections don't exist yet
-
The addCatch Function - Saving Data with RADFish
const addCatch = async (catchData) => {
  // Get the catch collection from RADFish
  const catchCollection = app.stores[STORE_NAMES.TRIP_STORE]
    .getCollection(COLLECTION_NAMES.CATCH_COLLECTION);

  // Format data with proper types and metadata
  const newCatchData = {
    ...catchData,
    id: crypto.randomUUID(),
    tripId: tripId,
    weight: Number(catchData.weight),
    length: Number(catchData.length),
    createdAt: new Date().toISOString(),
  };

  // Save to IndexedDB using RADFish's create method
  await catchCollection.create(newCatchData);

  // Update local state for instant UI feedback
  setCatches(prev => [newCatchData, ...prev]);
};
RADFish Features Used:
create(): Saves new records with automatic schema validation- Type Conversion: Ensures data matches schema field types
- Async Operations: All database operations return promises
-
Automatic Loading with useEffect
useEffect(() => {
  if (tripId) {
    loadCatches();
  }
}, [app, tripId]);
This ensures catches are loaded whenever the component mounts or the
tripIdchanges.
3.4: Understanding the Return Values
Both hooks follow a similar pattern of returning useful values. The useCatchData hook returns an object with four properties:
return {
  catches,      // State value: Array of catch records
  isLoading,    // State value: Boolean loading indicator
  addCatch,     // Function: Adds a new catch to the database
  setCatches,   // Function: Direct state setter for optimistic updates
};
How Components Use These Values:
catches: Iterate over this array to display the list of recorded catchesisLoading: Show loading indicators or disable buttons while data loadsaddCatch: Call this when the user submits the "Add Catch" formsetCatches: Use for immediate UI updates (like reordering or editing)
3.5: Benefits of Custom Hook Patterns
- Encapsulation: All RADFish/IndexedDB operations are hidden inside the hook
- Clean API: Components get a simple interface without worrying about implementation
- Error Handling: Centralized error management with the
onErrorcallback - Performance: Automatic loading and state management optimizations
Compare the clean hook usage:
const { catches, addCatch } = useCatchData(tripId);
To what you'd need without it:
- Manual state management
- Direct RADFish store access
- Error handling in every component
- Loading state tracking
- Data formatting logic
The custom hook abstracts all this complexity!
3.6: Summary - The Power of Custom Hooks
In this section, you've learned about two custom hooks that demonstrate different levels of complexity:
useTripNavigation: A simple hook that extracts navigation patterns, showing how even basic repeated code benefits from hooksuseCatchData: A complex hook that manages data loading, state, and database operations, demonstrating the full power of custom hooks
Together, these hooks allow the CatchLog component to focus purely on UI concerns while all the business logic is cleanly encapsulated. This pattern scales well as your application grows. You can create hooks for authentication, data synchronization, form validation, and any other cross-cutting concerns.
Step 4: Implementing Form Event Handlers
Now we'll implement the event handlers for managing form inputs and submissions. This involves two steps: implementing the handlers and connecting them to the form elements.
You'll implement 5 main event handlers:
handleInputChange- For text and select inputshandleTimeChange- For the TimePicker componentresetForm- To clear the formhandleAddCatch- For adding new catcheshandleSubmit- For proceeding to the next step
The advanced handlers for editing recorded catches are already provided for you.
4.1: Connecting Handlers to Form Elements
Before implementing the handlers, you need to understand that the form elements currently use placeholder handlers. After implementing your event handlers, you'll need to replace these placeholders:
// Current placeholder handlers that need to be replaced:
<Form onSubmit={() => {}}>  {/* Replace with: onSubmit={handleAddCatch} */}
  <Select onChange={() => {}}>  {/* Replace with: onChange={handleInputChange} */}
  <TextInput onChange={() => {}}>  {/* Replace with: onChange={handleInputChange} */}
  <TimePicker onChange={() => {}}>  {/* Replace with: onChange={handleTimeChange} */}
</Form>
4.2: Input Change Handlers
Now let's implement the handlers for managing form input changes. Uncomment the placeholder handlers and add the following code:
// --- Event Handlers for New Catch Form ---
/**
 * Handles input changes for new catch form
 * @param {Event} e - Input change event
 */
const handleInputChange = (e) => {
  const { name, value } = e.target;
  setCurrentCatch((prev) => ({ ...prev, [name]: value }));
  // Clear error for this field when user starts typing
  if (errors[name]) {
    setErrors((prev) => ({ ...prev, [name]: undefined }));
  }
};

/**
 * Handles time picker changes for new catch form
 * @param {string} time - Selected time value
 */
const handleTimeChange = (time, fieldName = "time") => {
  setCurrentCatch((prev) => ({ ...prev, [fieldName]: time }));
  // Clear error for this field when user selects time
  if (errors[fieldName]) {
    setErrors((prev) => ({ ...prev, [fieldName]: undefined }));
  }
};

/**
 * Resets the new catch form to initial state
 */
const resetForm = () => {
  setCurrentCatch({
    species: "",
    weight: "",
    length: "",
    latitude: "",
    longitude: "",
    time: "",
  });
  setErrors({});
};
Understanding the Handlers:
handleInputChange: Manages text and select inputs, clears field-specific errors on changehandleTimeChange: Specific handler for the TimePicker componentresetForm: Utility function to clear the form after successful submission
4.3: Form Submission Handlers
Now let's implement the submission handlers for both adding new catches and proceeding to the next step:
/**
 * Handles new catch form submission
 * @param {Event} e - Form submit event
 */
const handleAddCatch = async (e) => {
  e.preventDefault();
  try {
    const success = await addCatch(currentCatch);

    if (success) {
      // Reset form and increment key to force TimePicker re-render
      resetForm();
      setCatchTimeKey((prevKey) => prevKey + 1);
    } else {
      throw new Error("Failed to add catch");
    }
  } catch (error) {
    console.error("Error adding catch:", error);
  }
};

/**
 * Handles main form submission to proceed to next step
 * @param {Event} e - Form submit event
 */
const handleSubmit = async (e) => {
  e.preventDefault();
  try {
    // Update trip step
    const success = await updateTrip({ step: 3 });
    if (success) {
      navigateWithTripId("/end", tripId);
    } else {
      throw new Error("Failed to update trip step");
    }
  } catch (error) {
    console.error("Error updating trip step:", error, "Trip ID:", tripId);
  }
};
Key Implementation Details:
handleAddCatch: Uses theaddCatchfunction from our custom hook, includes form reset logichandleSubmit: Updates the trip step and navigates to the next page usingupdateTripfromuseTripData- Validation placeholders: Comments show where validation will be added in lesson 5
4.4: Connecting Your Handlers
After implementing all 5 event handlers, you need to connect them to the form elements. Replace the placeholder handlers throughout the form:
// Replace Form onSubmit
<Form
  onSubmit={() => {}}
  onSubmit={handleAddCatch}
  large
  className="margin-top-3 width-full"
>

// Replace all input onChange handlers
<Select onChange={() => {}}>
<Select onChange={handleInputChange}>

<TextInput onChange={() => {}}>
<TextInput onChange={handleInputChange}>

// Replace TimePicker onChange
<TimePicker onChange={() => {}}>
<TimePicker onChange={handleTimeChange}>

// Replace footer button onClick
<Button onClick={() => {}}>
<Button onClick={handleSubmit}>
Don't forget this step! Your event handlers won't work until you connect them to the form elements by replacing all the onChange={() => {}} placeholders.
Step 5: Understanding the Form Structure and UI Components
In this step, we'll explore the form structures that are already provided in the initial code. Since you've already learned how to build forms in lessons 2, we're providing the complete form structure so you can focus on understanding how the components work together for catch logging.
5.1: New Catch Entry Form Structure
Let's examine the complete form structure for adding new catches that's already provided:
  return (
    <Layout currentStep={2}>
      {/* New Catch Entry Form Section */}
      <div className="width-full margin-y-0 margin-x-auto display-flex flex-column flex-align-start">
        <Form
          onSubmit={handleAddCatch}
          large
          className="margin-top-3 width-full"
        >
          {/* Species Dropdown */}
          <FormGroup>
            <Label
              htmlFor="species"
              requiredMarker
            >
              Species
            </Label>
            <Select
              id="species"
              name="species"
              value={currentCatch.species}
              onChange={handleInputChange}
            >
              <option value="">-Select-</option>
              {SPECIES_OPTIONS.map((species) => (
                <option key={species} value={species}>
                  {species}
                </option>
              ))}
            </Select>
          </FormGroup>
Key Features of the Provided Form:
- Layout Component: Wraps the form content and handles the grid/step indicator display
- Species Dropdown: Uses
SPECIES_OPTIONSconstant for consistent data - Form Structure: Follows USWDS patterns established in previous lessons
- Error Integration: Each field is prepared for validation feedback
- Accessibility: Proper labels, hints, and ARIA attributes throughout
5.2: Weight, Length, and Time Input Structure
The provided form includes measurement and timing fields with the following structure:
{
  /* Weight & Length Inputs Row */
}
<div className="display-flex gap-2 width-full">
  {/* Weight Input*/}
  <div className="flex-1">
    <FormGroup error={errors.weight}>
      <Label htmlFor="weight" error={errors.weight} requiredMarker>
        Weight
      </Label>
      <span className="usa-hint display-block text-left">lbs</span>
      <TextInput
        id="weight"
        name="weight"
        type="number"
        value={currentCatch.weight}
        onChange={handleInputChange}
        validationStatus={errors.weight ? "error" : undefined}
        aria-describedby="weight-error-message"
      />
      <ErrorMessage id="weight-error-message" className="font-sans-2xs">
        {errors.weight}
      </ErrorMessage>
    </FormGroup>
  </div>
  {/* Length Input */}
  <div className="flex-1">
    <FormGroup error={errors.length}>
      <Label htmlFor="length" error={errors.length} requiredMarker>
        Length
      </Label>
      <span className="usa-hint display-block text-left">inches</span>
      <TextInput
        id="length"
        name="length"
        type="number"
        value={currentCatch.length}
        onChange={handleInputChange}
        validationStatus={errors.length ? "error" : undefined}
        aria-describedby="length-error-message"
      />
      <ErrorMessage id="length-error-message" className="font-sans-2xs">
        {errors.length}
      </ErrorMessage>
    </FormGroup>
  </div>
</div>;

{
  /* Catch Time Input */
}
<FormGroup error={errors.time}>
  <Label
    htmlFor="catchTime"
    error={errors.time}
    className="input-time-label"
    requiredMarker
  >
    Time
  </Label>
  <TimePicker
    key={catchTimeKey} // Use key to force re-render on reset
    id="catchTime"
    name="time"
    defaultValue={currentCatch.time}
    onChange={handleTimeChange}
    minTime={TIME_PICKER_CONFIG.MIN_TIME}
    maxTime="23:30"
    step={TIME_PICKER_CONFIG.STEP}
    validationStatus={errors.time ? "error" : undefined}
    className={errors.time ? "usa-input--error" : ""}
    aria-describedby="time-error-message"
  />
  <ErrorMessage id="time-error-message" className="font-sans-2xs">
    {errors.time}
  </ErrorMessage>
</FormGroup>;
Important Features of the Provided Implementation:
- Error Integration: Each field includes
ErrorMessagecomponents for validation feedback(will be explained in lesson 5) - Responsive Layout: Weight and length use flexbox for side-by-side layout on mobile devices
- TimePicker Key Strategy: Uses
catchTimeKeyto force re-render on form reset (a common React pattern for controlled components) - Validation Infrastructure: All fields include
validationStatusprops(will be explained in lesson 5) - Coordinate Fields: Optional latitude/longitude inputs for GPS data collection
The form includes a full-width "Add Catch" button that triggers the handleAddCatch function we implemented in Step 4. This creates new catch records and updates the UI immediately.
Step 6: Understanding the Recorded Catches Display
The initial code also provides a comprehensive section for displaying and managing recorded catches. Let's examine how this works and the features it provides.
6.1: Recorded Catches List Architecture
The recorded catches section uses the following structure:
{/* Recorded Catches Section */}
{catches.length > 0 && (
  <>
    {/* Container for the recorded catches section */}
    <div className="width-full border-top border-base-lighter padding-top-105 margin-top-105">
      <h2 className="font-heading-lg margin-bottom-1">
        Recorded Catches
      </h2>
      {/* List container for individual catch items */}
      <div className="display-flex flex-column width-full">
        {catches.map((catchItem, index) => {
          // Get errors for this specific catch item, default to empty object if none
          const catchErrors = recordedCatchErrors[index] || {};

          return (
            // Container for a single recorded catch item
            <div
              key={catchItem.id || index}
              className="padding-y-1 border-bottom border-base-lighter"
            >
              {/* Wrapper for the recorded catch form elements */}
              <div className="position-relative width-full">
                {/* Delete button positioned absolutely */}
                <div className="position-absolute top-neg-105 right-0">
                  <Button
                    type="button"
                    unstyled // Use unstyled to allow custom styling with utilities
                    onClick={() => handleDeleteCatch(index)}
                    className="text-secondary hover:bg-base-lightest border-radius-sm padding-05 display-flex flex-align-center"
                    aria-label="Delete this catch"
                  >
                    Delete{" "}
                    <Icon.Delete size={3} aria-hidden="true" />
                  </Button>
                </div>

                {/* Recorded Catch Form Fields */}
                <FormGroup error={catchErrors.species}>
                  <Label
                    htmlFor={`recorded-species-${index}`}
                    error={catchErrors.species}
                    requiredMarker
                  >
                    Species
                  </Label>
                  <Select
                    id={`recorded-species-${index}`}
                    name="species"
                    value={catchItem.species}
                    className="margin-top-05 margin-bottom-0"
                    onChange={(e) =>
                      handleRecordedCatchChange(
                        index,
                        "species",
                        e.target.value,
                      )
                    }
                    validationStatus={
                      catchErrors.species ? "error" : undefined
                    }
                  >
                    <option value="">-Select-</option>
                    {SPECIES_OPTIONS.map((species) => (
                      <option key={species} value={species}>
                        {species}
                      </option>
                    ))}
                  </Select>
                  <ErrorMessage className="font-sans-2xs">
                    {catchErrors.species}
                  </ErrorMessage>
                </FormGroup>
Key Features of the Provided Implementation:
- Conditional Rendering: Only shows when catches exist (
{catches.length > 0 && (...)}pattern) - Dynamic Field IDs: Each field gets a unique ID using the index (e.g.,
recorded-species-${index}) - Delete Functionality: Positioned delete button with confirmation dialog
- Error Integration: Same error pattern as new catch form, but uses
recordedCatchErrors[index] - Inline Editing: Users can modify catches directly in the list without separate edit modes
6.2: Understanding the Provided Event Handlers for Recorded Catches
The event handlers for managing recorded catches are already provided in your file. These advanced functions demonstrate RADFish patterns including direct database access and optimistic UI updates.
6.2.1: The Update Catch Function
Let's examine the provided updateCatch function that handles updating individual catch records:
  // --- Event Handlers for Recorded Catches ---
  /**
   * Update a specific catch
   * @param {number} index - Index of the catch in the catches array
   * @param {string} field - Field to update
   * @param {any} value - New value for the field
   * @returns {boolean} Success status
   */
  const updateCatch = async (index, field, value) => {
    if (!app || index < 0 || index >= catches.length) {
      console.error("Cannot update catch: invalid parameters");
      return false;
    }

    const catchToUpdate = catches[index];

    try {
      const tripStore = app.stores[STORE_NAMES.TRIP];
      const catchCollection = tripStore.getCollection(COLLECTION_NAMES.CATCH_COLLECTION);

      // Prepare data for update (ensure correct types)
      const updateData = { [field]: value };

      // Convert to number if it's a numeric field, handle empty string
      if (["weight", "length", "latitude", "longitude"].includes(field)) {
        updateData[field] = value === "" ? undefined : Number(value);
      }

      // Update in RADFish/IndexedDB
      await catchCollection.update({ id: catchToUpdate.id, ...updateData });

      // Optimistic UI update
      const updatedCatches = [...catches];
      updatedCatches[index] = { ...catchToUpdate, [field]: updateData[field] };
      setCatches(updatedCatches);
      return true;
    } catch (err) {
      console.error("Error updating catch:", err, "Catch ID:", catchToUpdate.id);
      return false;
    }
  };
Key Implementation Details:
- Parameter Validation: Checks for valid app, index bounds, and catch existence
- Direct Collection Access: Uses
getCollection(COLLECTION_NAMES.CATCH_COLLECTION)for immediate database operations - Type Conversion: Converts numeric fields appropriately, handling empty strings as
undefined - Optimistic Updates: Updates the UI immediately while the database operation completes
6.2.2: The Change Handlers
The wrapper functions that connect form inputs to the update function are also provided:
  /**
   * Handles changes to recorded catch fields
   * @param {number} index - Index of the catch in the catches array
   * @param {string} field - Field name to update
   * @param {any} value - New value for the field
   */
  const handleRecordedCatchChange = async (index, field, value) => {
    const success = await updateCatch(index, field, value);

    if (!success) {
      console.error("Failed to update recorded catch");
    }
  };

  /**
   * Handles time changes for recorded catches
   * @param {number} index - Index of the catch in the catches array
   * @param {string} time - New time value
   */
  const handleRecordedTimeChange = async (index, time) => {
    const success = await updateCatch(index, "time", time);

    if (!success) {
      console.error("Failed to update recorded catch time");
    }
  };
Understanding the Pattern:
- Wrapper Functions: These provide a clean interface between UI events and database operations
- Error Handling: Logs failures but doesn't interrupt the user experience
- Specific Time Handler: TimePicker components need a dedicated handler due to their different event signature
6.2.3: The Delete Functionality
The delete functionality is also provided with proper separation of concerns, including both a utility function and a wrapper handler:
  /**
   * Delete a catch
   * @param {number} index - Index of the catch to delete
   * @param {boolean} skipConfirmation - Skip confirmation dialog (default: false)
   * @returns {boolean} Success status
   */
  const deleteCatch = async (index, skipConfirmation = false) => {
    if (index < 0 || index >= catches.length) {
      console.error("Cannot delete catch: invalid index");
      return false;
    }

    if (!skipConfirmation && !window.confirm("Are you sure you want to delete this catch?")) {
      return false;
    }

    const catchToDelete = catches[index];

    try {
      const tripStore = app.stores[STORE_NAMES.TRIP];
      const catchCollection = tripStore.getCollection(COLLECTION_NAMES.CATCH_COLLECTION);

      // Remove from RADFish/IndexedDB
      await catchCollection.delete({id: catchToDelete.id});

      // Update local state to remove from UI
      setCatches(prev => prev.filter((_, i) => i !== index));

      return true;
    } catch (err) {
      console.error("Error deleting catch:", err, "Catch ID:", catchToDelete.id);
      return false;
    }
  };

  /**
   * Handles deletion of a recorded catch
   * @param {number} index - Index of the catch to delete
   */
  const handleDeleteCatch = async (index) => {
    const success = await deleteCatch(index);

    if (!success) {
      console.error("Failed to delete catch");
    }
  };
Key Implementation Patterns:
- Separation of Concerns:
deleteCatchutility function handles the core logic,handleDeleteCatchprovides the UI interface - Optional Confirmation:
skipConfirmationparameter allows bypassing the dialog for programmatic deletions - Index Validation: Ensures the catch exists before attempting deletion
- Confirmation Dialog: Uses
window.confirm()to prevent accidental deletions - Optimistic UI: Removes the catch from the UI immediately upon successful database deletion
- Filter Pattern: Uses
filter((_, i) => i !== index)to remove the item at the specific index
The recorded catch handlers involve advanced patterns like direct database access and optimistic UI updates. By providing these, you can focus on learning the core concepts of dynamic form inputs and event handling without getting overwhelmed by the complexity of managing existing records.
Key Patterns in the Provided Handlers:
- Direct Database Access: The handlers access RADFish collections directly for immediate updates
- Optimistic Updates: UI updates immediately while database operations happen in background
- Type Conversion: Handles converting numeric fields appropriately (weight, length, coordinates)
- Error Handling: Comprehensive error logging and graceful failure handling
- Confirmation Dialogs: Delete operations include user confirmation for safety
- Index-Based Operations: Uses array indices to track which catch is being modified
Step 7: Testing the Complete Implementation
After implementing the 5 event handlers (handleInputChange, handleTimeChange, resetForm, handleSubmit, and handleMainSubmit), let's test both adding new catches and managing recorded catches.
7.1: Test Adding New Catches
- Navigate to the Catch Log page (you should be there after completing lesson 3)
- Fill out all required fields in the "Add Catch" form:
- Species: Select from the dropdown (e.g., "Yellowfin Tuna")
- Weight: Enter a number (e.g., "25.5")
- Length: Enter a number (e.g., "32")
- Time: Select a time (e.g., "10:30")
- Latitude/Longitude: Optional coordinate fields
- Click "Add Catch" and observe:
- Form resets automatically
- New catch appears in "Recorded Catches" section
- TimePicker properly resets due to key strategy
7.2: Test Editing and Deleting Catches
- Edit a catch: Change values in any recorded catch field and observe immediate updates
- Delete a catch: Click the delete button and confirm the deletion
- Verify persistence: Refresh the page to confirm data persists in IndexedDB
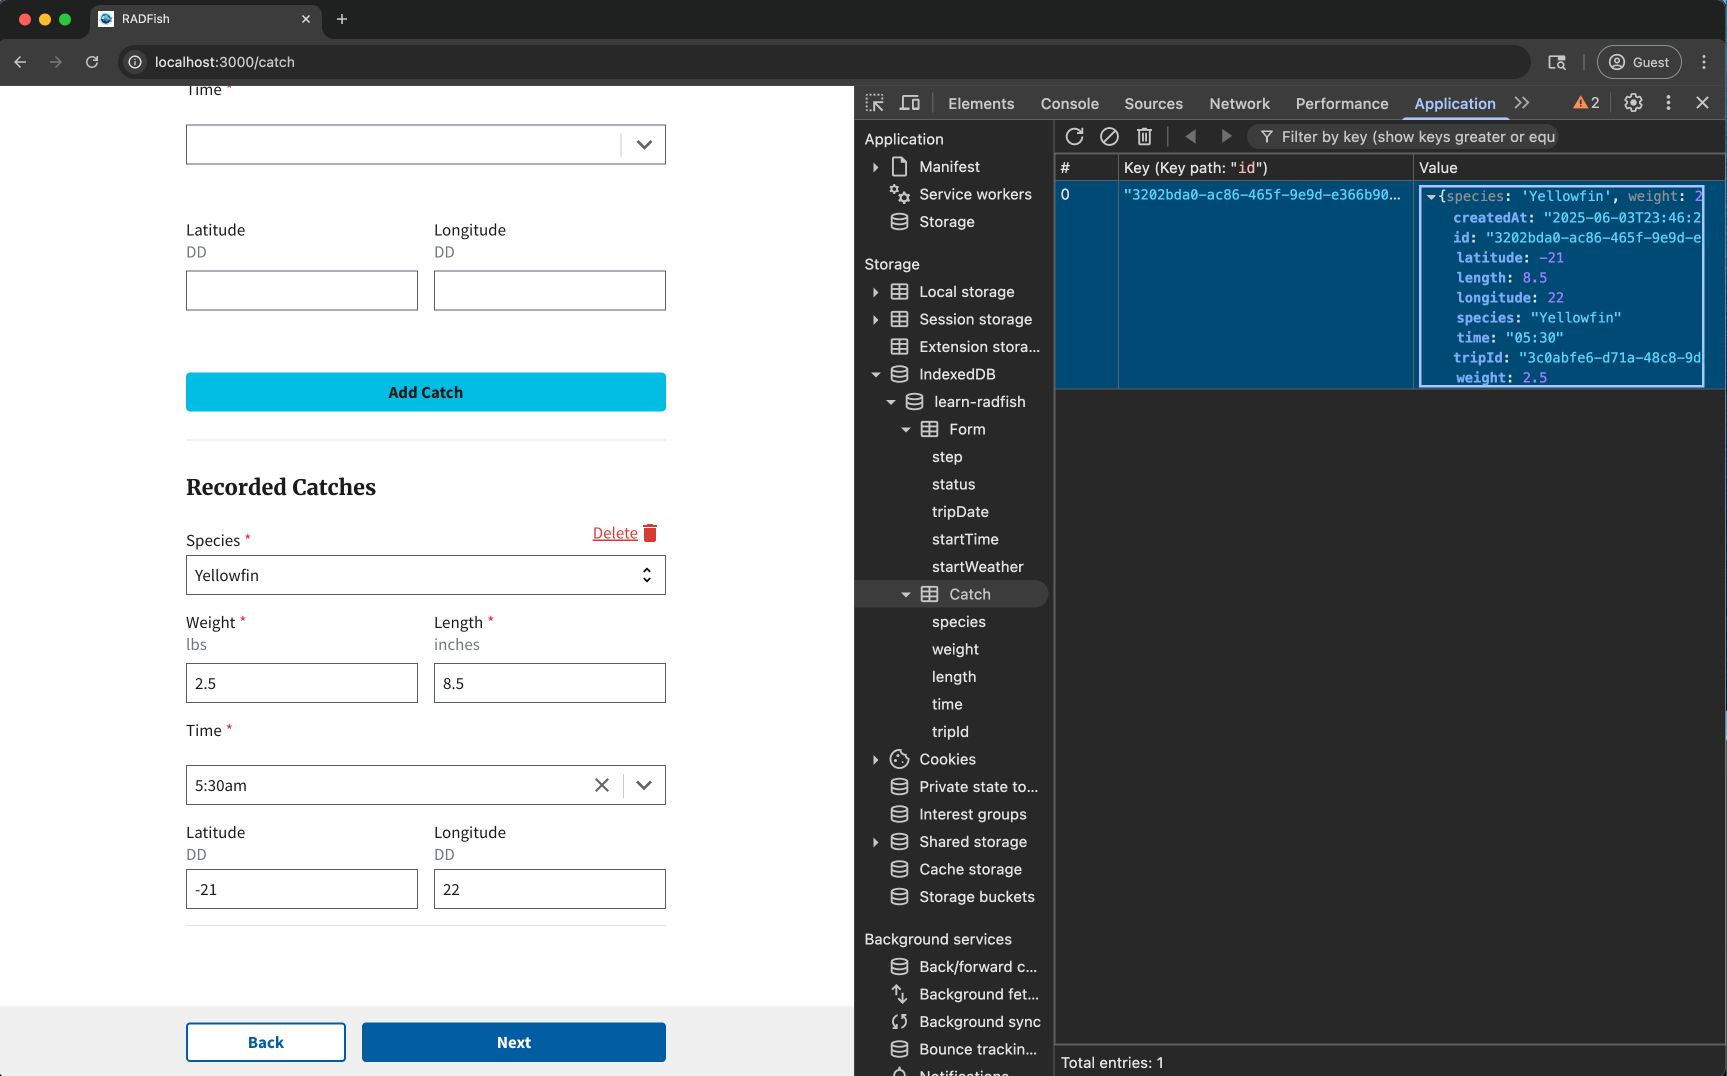
You can verify catch data is being saved by inspecting IndexedDB:
- Open your browser's developer tools (F12 or right-click → Inspect).
- Go to the "Application" tab (Chrome/Edge) or "Storage" tab (Firefox).
- Navigate to IndexedDB → learn-radfish → trip → Catch
- You should see your catch records with all the form data
Conclusion
You have successfully implemented comprehensive catch logging functionality! The application now:
- Uses Custom Hooks: Leverages
useCatchDatafor catch management, building on lesson 3's hook patterns - Extends RADFish Storage: Adds a Catch collection with proper schema and relationships
- Provides Full CRUD Operations: Create, read, update, and delete catches with immediate UI feedback
- Includes Error Infrastructure: Complete validation framework prepared for lesson 5
- Handles Complex UI: TimePicker reset strategies, optimistic updates, and responsive layouts
- Maintains Data Integrity: Proper type conversions and error handling throughout
The catch logging system demonstrates advanced RADFish patterns while maintaining the educational progression established in earlier lessons. Users can now log multiple catches during their trip, with each catch stored independently but linked to the parent trip through tripId relationships.
In lesson 5, we'll implement comprehensive validation for start trip, new catch , and recorded catches forms, utilizing the error handling infrastructure we've built in this lesson.